Beginner’s Guide to Low-Maintenance, Low-Water Lawns
New to homeownership and tired of thirsty grass? Learn simple, beginner-friendly ways to replace lawn with rock, mulch, or low-water alternatives.
From Thirsty Grass to Easy-Care Yard: A First-Timer’s Question
We recently got a call from a new homeowner — let’s call her Sarah — who had a question we’re hearing more and more:
“We don’t have the time to maintain a lawn, and it seems like it uses a ton of water. Can we just get rid of most of the grass and replace it with rocks or something else?”
Sarah and her husband had just moved into their first home. Between busy work schedules and learning everything that comes with homeownership, the last thing they wanted to worry about was mowing, watering, and fertilizing a big patch of grass. She found us on Instagram, gave us a call, and asked for an assessment and quote on how to reduce their grass before winter.
That call is a perfect example of where a low-maintenance, low-water lawn can be a game-changer. So we put together this beginner-friendly guide to help homeowners like Sarah understand their options.
Step 1: Decide How Much Grass You Really Need
When we visit a yard like Sarah’s for the first time, our first question isn’t, “What kind of rock do you want?” Our first question is, “How do you actually use this space?”
Before anyone starts ripping out turf, we walk through questions like:
- Do you have kids or pets who need a soft area for play?
- Do you entertain a lot and need space for chairs, fire pits, or grilling?
- Do you care more about looks or function (or a balance of both)?
- Are you okay with some green plants, or do you want nearly zero watering?
For many folks, the right answer isn’t “no grass at all” — it’s less grass, used more intentionally. That might mean a smaller lawn area you actually use, surrounded by low-maintenance rock, mulch, or planting beds.
Step 2: Understand Your Main Low-Water Options
Once we know how you want to use the yard, we walk through the main alternatives to a traditional, thirsty lawn. Here are the beginner-friendly basics we often share on estimates like Sarah’s.
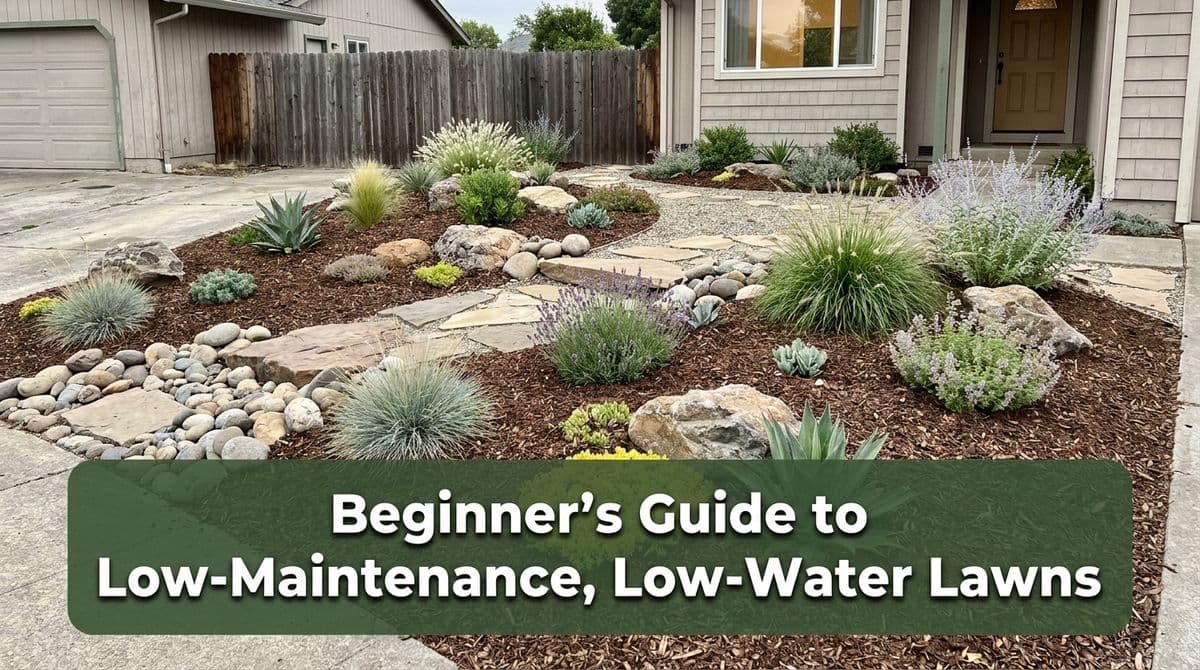
1. Decorative Rock (Gravel, River Rock, etc.)
Best for: Very low watering and low maintenance, clean modern look.
Rock is usually what people like Sarah picture first when they say, “Can we just put rocks down?” It’s a great option, but it’s not quite as simple as dumping a load of gravel.
Pros:
- Doesn’t need watering or mowing.
- Can last decades with minimal touch-ups.
- Works well with shrubs, trees, and drip irrigation.
- Lots of colors and sizes for design flexibility.
Cons:
- Rock can get hot in full sun.
- Weeds will still try to pop through if prep is skipped.
- Harder to walk or play on than grass.
For Sarah, we talked about using rock in the side yard and along the fence — areas they didn’t plan to use for play.
2. Mulch (Bark, Wood Chips, or Organic Mulch)
Best for: Softer look, cooler surface, great around trees and planting beds.
Mulch is another popular choice when people want something natural and low-water that’s not grass.
Pros:
- Helps soil retain moisture for any nearby plants.
- Stays cooler than rock in summer.
- Good for kids’ play areas under supervision (depending on material).
Cons:
- Breaks down over time and needs to be topped up every 1–3 years.
- Can float or wash out on steep slopes.
On Sarah’s yard, we suggested mulch around existing trees and any new low-water shrubs, with drip irrigation underneath if they wanted added greenery.
3. Reduced Lawn + Drought-Tolerant Turf or Groundcovers
Best for: Homeowners who still want some green space, but with less water and work.
Sometimes we recommend keeping a smaller area of lawn rather than eliminating it completely. Options include:
- Drought-tolerant grass blends that use less water than traditional varieties.
- Low-growing groundcovers (depending on your region) that can handle some foot traffic.
This “hybrid” approach would give someone like Sarah a manageable patch of green for guests or a future pet, without committing to a full yard of mowing and watering.
Step 3: The Right Way to Remove Grass (So It Doesn’t Come Back)
A big part of our conversation with Sarah was clearing up a common misconception: you can’t just toss rock or mulch on top of existing grass and expect it to behave.
For a durable, low-maintenance yard, we walk homeowners through a basic three-step process:
- Remove or kill existing grass
We either physically remove the sod or use an appropriate removal method for the site. The goal is to get rid of the root system, not just the green blades. - Grade and level the soil
We shape the ground so water flows away from the house, not toward it, and so rain won’t puddle in your new rock or mulch. - Install a weed barrier (the right way)
In many rock installs, we use a professional-grade landscape fabric, properly overlapped and pinned. With mulch, we’re more selective, because plants and soil health matter. Either way, the goal is to cut down on weeds without causing drainage issues.
Only after those steps do we start bringing in rock, mulch, or plants. That’s how we keep things looking good for years, not just one season.
Step 4: Planning Your Timeline and Budget
Like Sarah, a lot of people call us in spring or early summer and say, “We’d love to have this done before winter.” That’s a realistic and smart goal.
Here’s what we usually recommend for first-time homeowners:
- Start with a walkthrough and quote. We look at your yard, talk through how you use it, and give you options at different price points.
- Phase the project if needed. Maybe this year you remove most of the grass and install rock in key areas, then add plants or a small lawn area next year.
- Ask about water savings. We can estimate how much irrigation you’ll likely save with a new design, which helps justify the investment.
For Sarah, we talked through getting the major grass removal and base work done in summer, so everything would be buttoned up and low-maintenance by the time winter rolled in.
Beginner-Friendly Takeaways for a Low-Maintenance Yard
If you’re in the same boat as Sarah — first home, busy schedule, and no interest in nursing a thirsty lawn — here are the big points to remember:
- You don’t have to go “all rock” to save water; a smaller, smarter lawn can still work.
- Prep matters more than the material. Proper grass removal, grading, and weed barrier are what make a yard truly low-maintenance.
- Rock, mulch, and reduced turf each have different pros and cons. The best mix depends on how you use your space.
- It’s okay to start simple. Even just converting one side yard or front strip can cut your weekend workload in half.
If you’re curious what a low-water, low-maintenance yard could look like at your home, we’re always happy to take a look, walk you through options like we did with Sarah, and put together a clear, no-pressure plan.